First you need to view an open check: See also How To Open a Check.
If you do not already have an open check displayed, there are multiple ways to view an open check, if you have access to the full Skyware system. If not, you must access an open check from the Restaurant Log in screen. (Again, most servers will only have access to the restaurant log in screen rather than the full Skyware system). All will take you to the Restaurant Check screen.
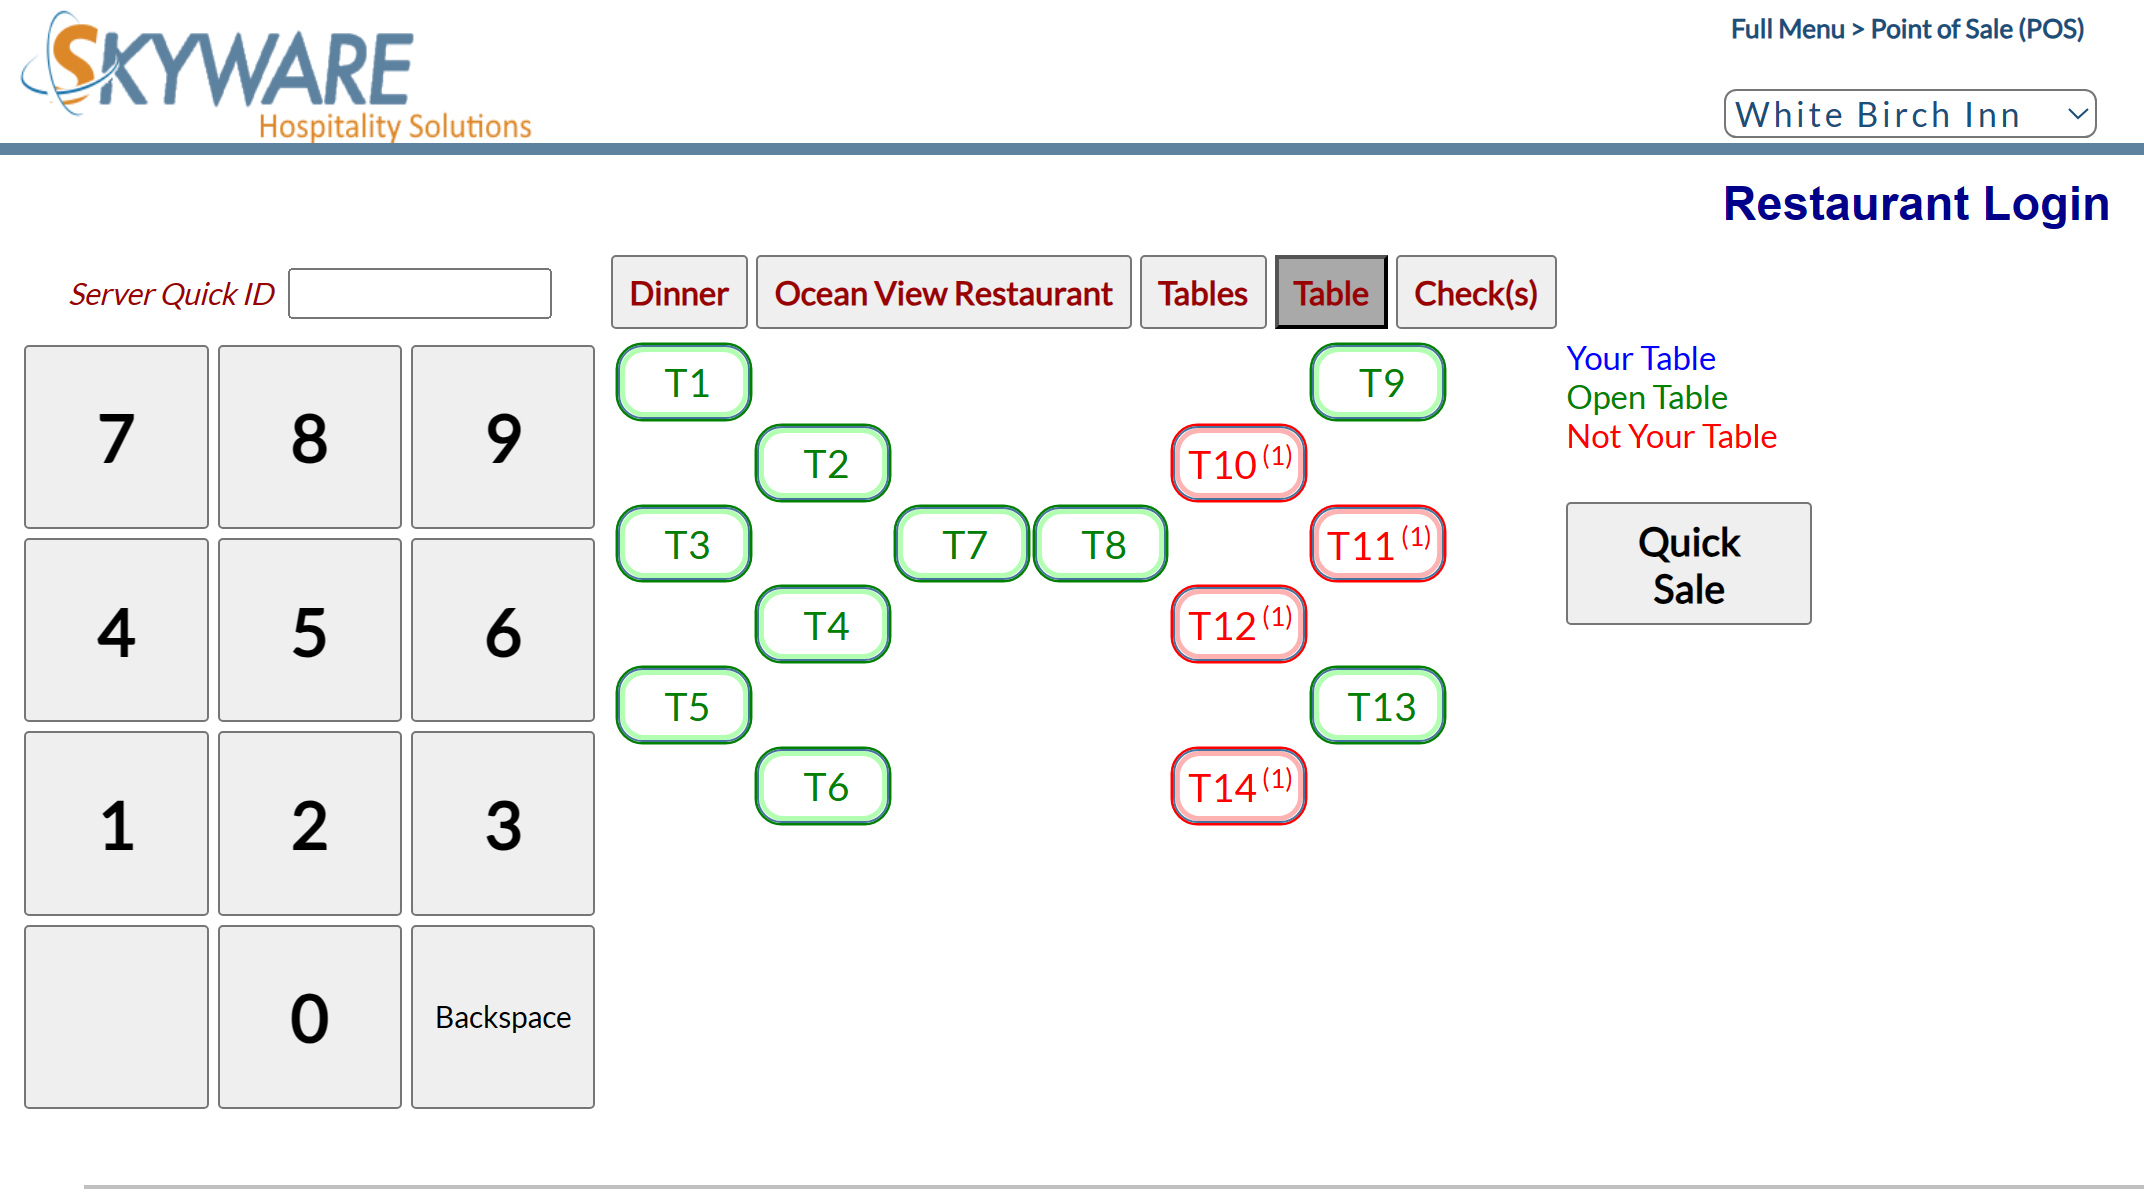
Enter your Server ID. You cannot create a check or view open checks for your tables from the restaurant log in page without a server ID number. Type the User number into the Server Quick ID log in field. This can be done using the keyboard, or by using the keypad on the screen.
Note: Any time you are on the restaurant start page you will need to enter your Server Quick ID button before you can do anything else.
i. Click the Table command, and select one of your tables with an open check (listed in blue) from the Table list. This will automatically take you to the restaurant check page for that table and the open checks) . Clicking on the Table command will show checks at specific tables (in parenthesis is the number of checks at the table).
ii. There is a button next to Table for Checks that will list all the table checks that are open.
iii. Click Quick Sale in the restaurant start page (on right) and when taken to the restaurant check page select one of the open checks listed in the Checks list on the left. Clicking on Quick Sale will only show open Quick Sale checks.
The Postings list on the right hand side of the Restaurant Check page provides the running total of the currently open check. The Payments tab (middle section below banner) has several fields and allows you to apply customer payments to the open check. When ready to make a payment to this open check, select the Payments tab.
Clicking on the Payments tab will open the payment option fields. Various options will be available such as cash, room charge or credit card (see Payment Type, below). Keep in mind, the selections you have available for Payment Type and the fields required are determined by how the Point of Sale (POS) system has been configured. See Point of Sale (POS) Configuration Menu Overview for further details.
Note: Any payment methods that have an * next to them require a Quick ID. Not all properties use them.
When chosen, all options will have a similar set of fields to complete, including splitting buttons, amount or tendered field, a refund button and fields for the Quick ID and Pass code. They do however differ slightly depending on the details (for example, cash payments will not have any fields to enter credit card details, and cash payment has an additional "change due" field).
The Amount or tendered field will be automatically completed (using the Total due on the Postings list as 100% of the check) but may be manually adjusted. Apply any calculated gratuities or discounts to the check before taking payment, and if you need to split the check, it is recommended that you apply credit card or room charge payments before applying Cash payments when a check is split. When ready, click the post button to post the payment to the check.
If one is shown, the gratuity field on the Payment tab is generally only used with credit card payments (see "Credit Card Payment" in the Payment Type section below for more details). In all other cases the Gratuity/Misc $ tab should be used. See also Applying Discounts or Gratuities to an Open Check.
Be sure to do this before posting payments for the check.
The Gratuity/Misc $ tab in the Restaurant Check page (middle section below banner) allows you to apply a gratuity (tip) and/or discounts to the check. These can be applied either as straight currency amounts (left) or as a percentage of the check (right) for both discounts and gratuities. Items can be set up in configuration to not allow a discount. The amount discounted will only apply to those items that allow discounts.
Use this tab to add an automatic gratuity and/or discount to the check, in either currency amount or as a percentage of the check. Any non-credit card payment where the gratuity needs to be recorded, the gratuity should be posted from the "Gratuity/Misc $" tab (ideally before the final payment).
For gratuities in particular, whether you apply them before or after printing the check for payment depends on the situation.
NOTE: It is not uncommon for customers to simply write a Total amount to charge on their check, or to add the tip amount incorrectly. Regardless of which applies, the number entered by the customer in the Total space of the printed check is the amount that must be charged.
If the restaurant has a policy of adding an automatic gratuity (for example to tables of 6 or more), use this tab to post the additional charge to the check before printing it for payment.
Alternately, if the customer has added a tip to their payment, you could apply that amount in this tab after receiving payment from the customer, creating a zero balance for the check and no mistakes in posting amounts.
For this reason, you may want to make a habit of applying customer-added gratuity to the check after printing the check. This ensures that you do not attempt to apply a gratuity to the check that does not add up to the total payment authorized by the customer.
Click the Gratuity/Misc $ tab to activate it.
Each of the (4) boxes on the tab has its own "Post" button associated with it. This allows you to enter the gratuity amount or percentage as well as the discount amount or percentage and post each separately.
What you do next depends on the situation you are applying.
- Apply Discount:
If you must apply a coupon for the meal, or an applicable discount (for example., AARP, hotel guest VIP club), enter the amount or percentage into the appropriate Discount text box and click the associated Post Discount button to apply it to the check.
- Apply Gratuity:
If you must apply an automatic gratuity to the check, enter either the amount or percentage into the appropriate Gratuity text box and click the associated Post Gratuity button to apply it to the check.
If the customer has added a gratuity to their payment, you have the following additional options:
Enter the total amount paid into either the Amount Tendered field (if cash payment) or the Amount field (if other type of payment), and click Post.
Then enter the remaining Total Due shown in the Postings as the Gratuity amount and click Post Gratuity. This should render a zero balance on the check.
OR:
Enter the gratuity amount written on the payment receipt and click Post Gratuity.
Then apply the full payment amount.
See also Splitting a Check.
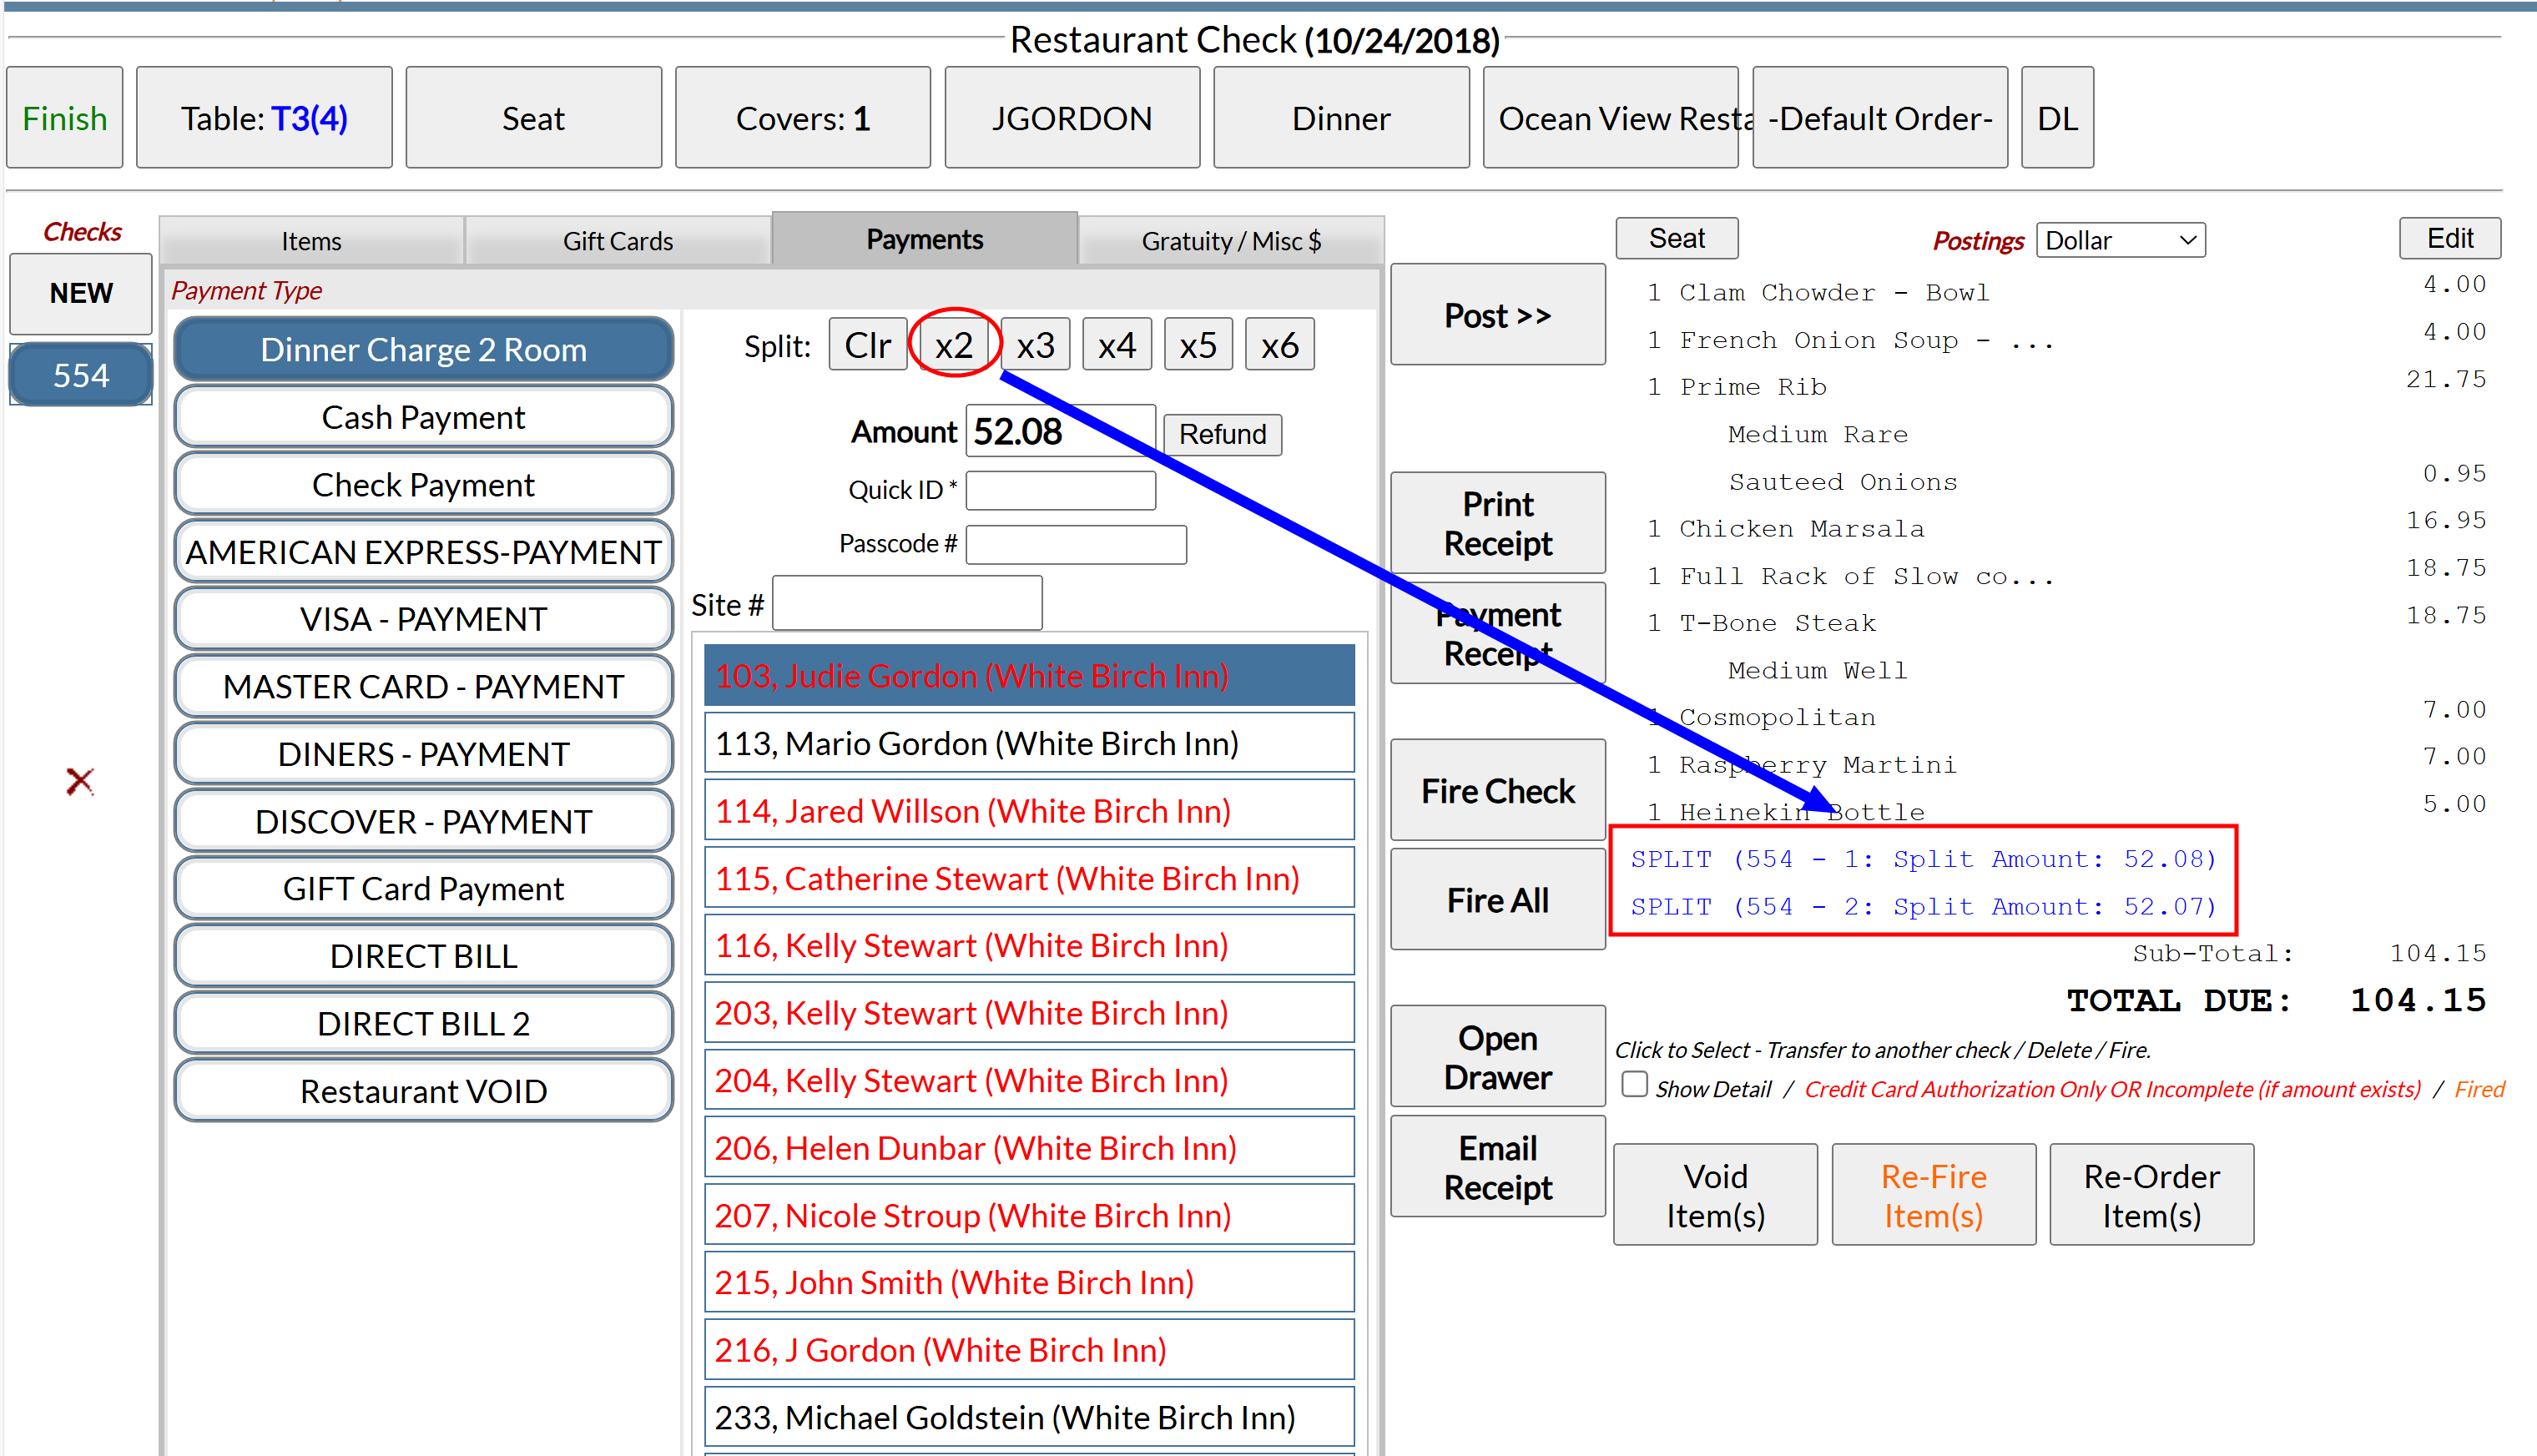
As can be seen the Payments tab field always shows buttons on the right hand side across the top for splitting. These allow you the option of instead of paying the check in one (100%), splitting the check evenly. The Split buttons allow you to select the number of splits the check should be divided into (from 2 to 6) simply by clicking the corresponding button (x2, x3 etc). When a split is selected, the check will be divided evenly (to the nearest penny) between the selected number of splits.
Each split is shown in the Posting section labeled separately, with the separate splits able to be clicked on for viewing in the payment field. The payment amount due for each split has been calculated for you, with the amount due for the first split displayed in the Amount field of the Payments tab.
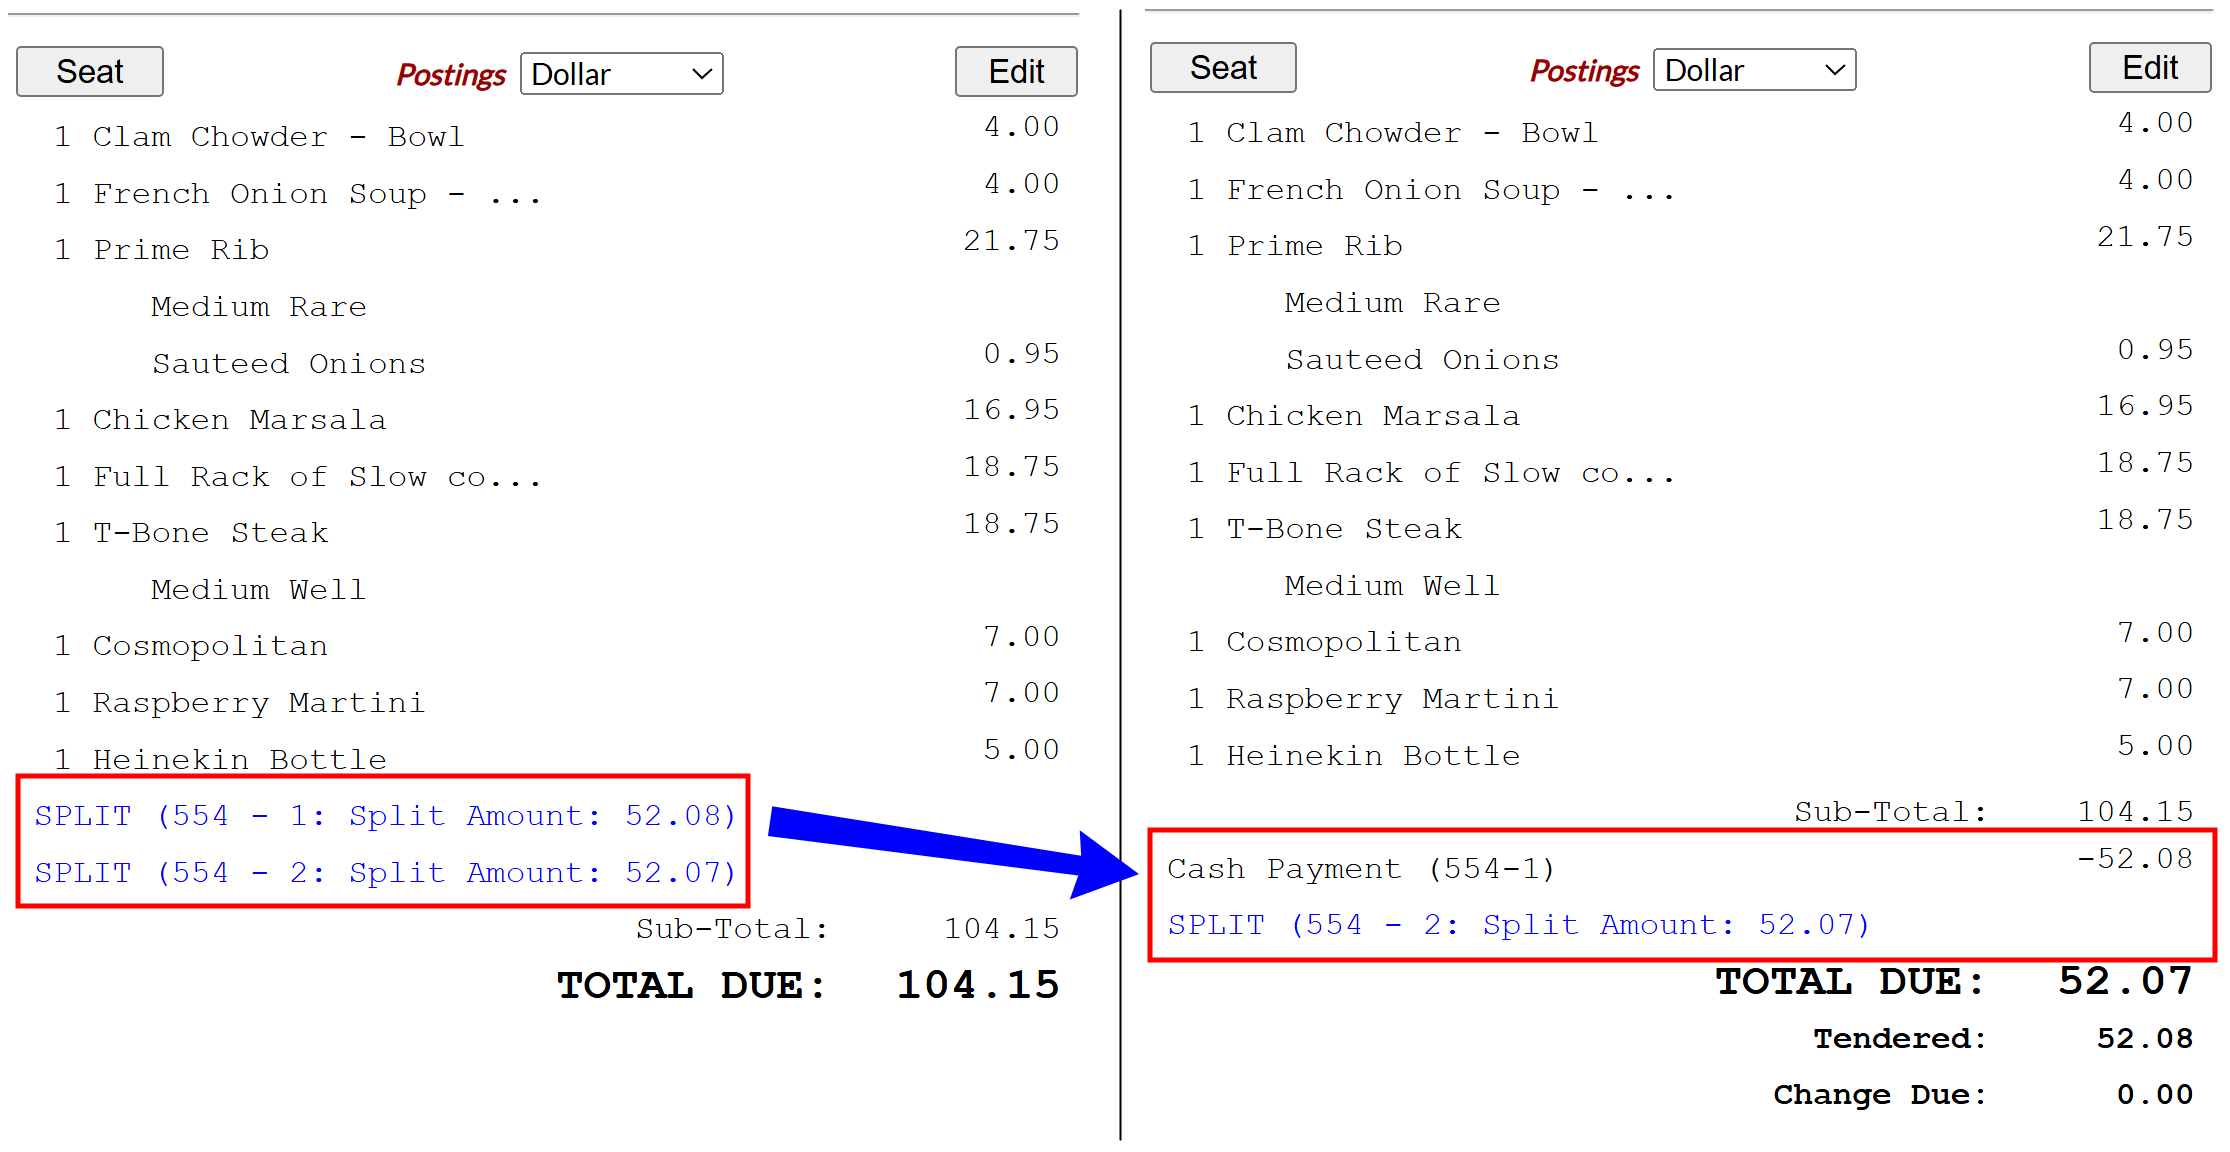
Note: A split does not generate a new check, however each split is labeled as a subdivision of the original check, with a suffix attached referring to each split individually (for example, if check 554 is split between 2, the postings area of the screen would show the two splits labeled as 554 - 1 and 554 - 2 respectively). This enables you to click on each split individually, treating them as separate checks for viewing and payment purposes.
Recommended Practice:Apply credit card or room charge payments before applying Cash payments.
Select the split you want by clicking on it and the amount associated with the split will be entered into the amount field. Select the payment method (see below for details of different payment types) and pay as usual.
Once the split has been paid, the relevant split line on the postings area will be replaced by the payment for that split.
Note: After payment has been entered for a split, that particular split line entry will no longer be click-able.
Continue selecting splits for payment until all splits have been paid
This option will display a list of guests and rooms within the property below the set of fields requiring completion.
For this option, you will need the room number or site number to charge to, as well as any other information required by the system. This may include Guest Name or Group Name if the guest is part of a group folio.
The room/guest entry selected for payment is displayed in BLUE.
Note: The server may be required to check the guest's ID before using this option.
Note: If the name/room is displayed in black, there is credit on the room and the room can be charged (the check added to the guest's bill). If the name/room is displayed in red, there is no credit, or too little credit to cover the posted check, currently associated with the name/room selected. if posted to a guest's room whose name is in red, Skyware will attempt to authorize the card for the charges but it may not be possible.
If the check is to be paid with cash, when the option is selected, a screen with a numerical keyboard will appear on the right (where the posting list appears for all other payment types).
This keypad may be used to enter the amount of cash given by the customer, or the amount may be typed directly into the "Tendered" field.
Enter theTendered amount and then click Post. The Change Due is automatically calculated.
Several different credit card options may be available, depending on the credit card options accepted at your Property. Be sure to select the CORRECT credit card type from those available. All credit card payment options have the same fields. The correct credit card option must be selected for a successful credit card swipe to occur.
Swipe the credit card to complete the credit card information fields and click post to issue the authorization for the payment.
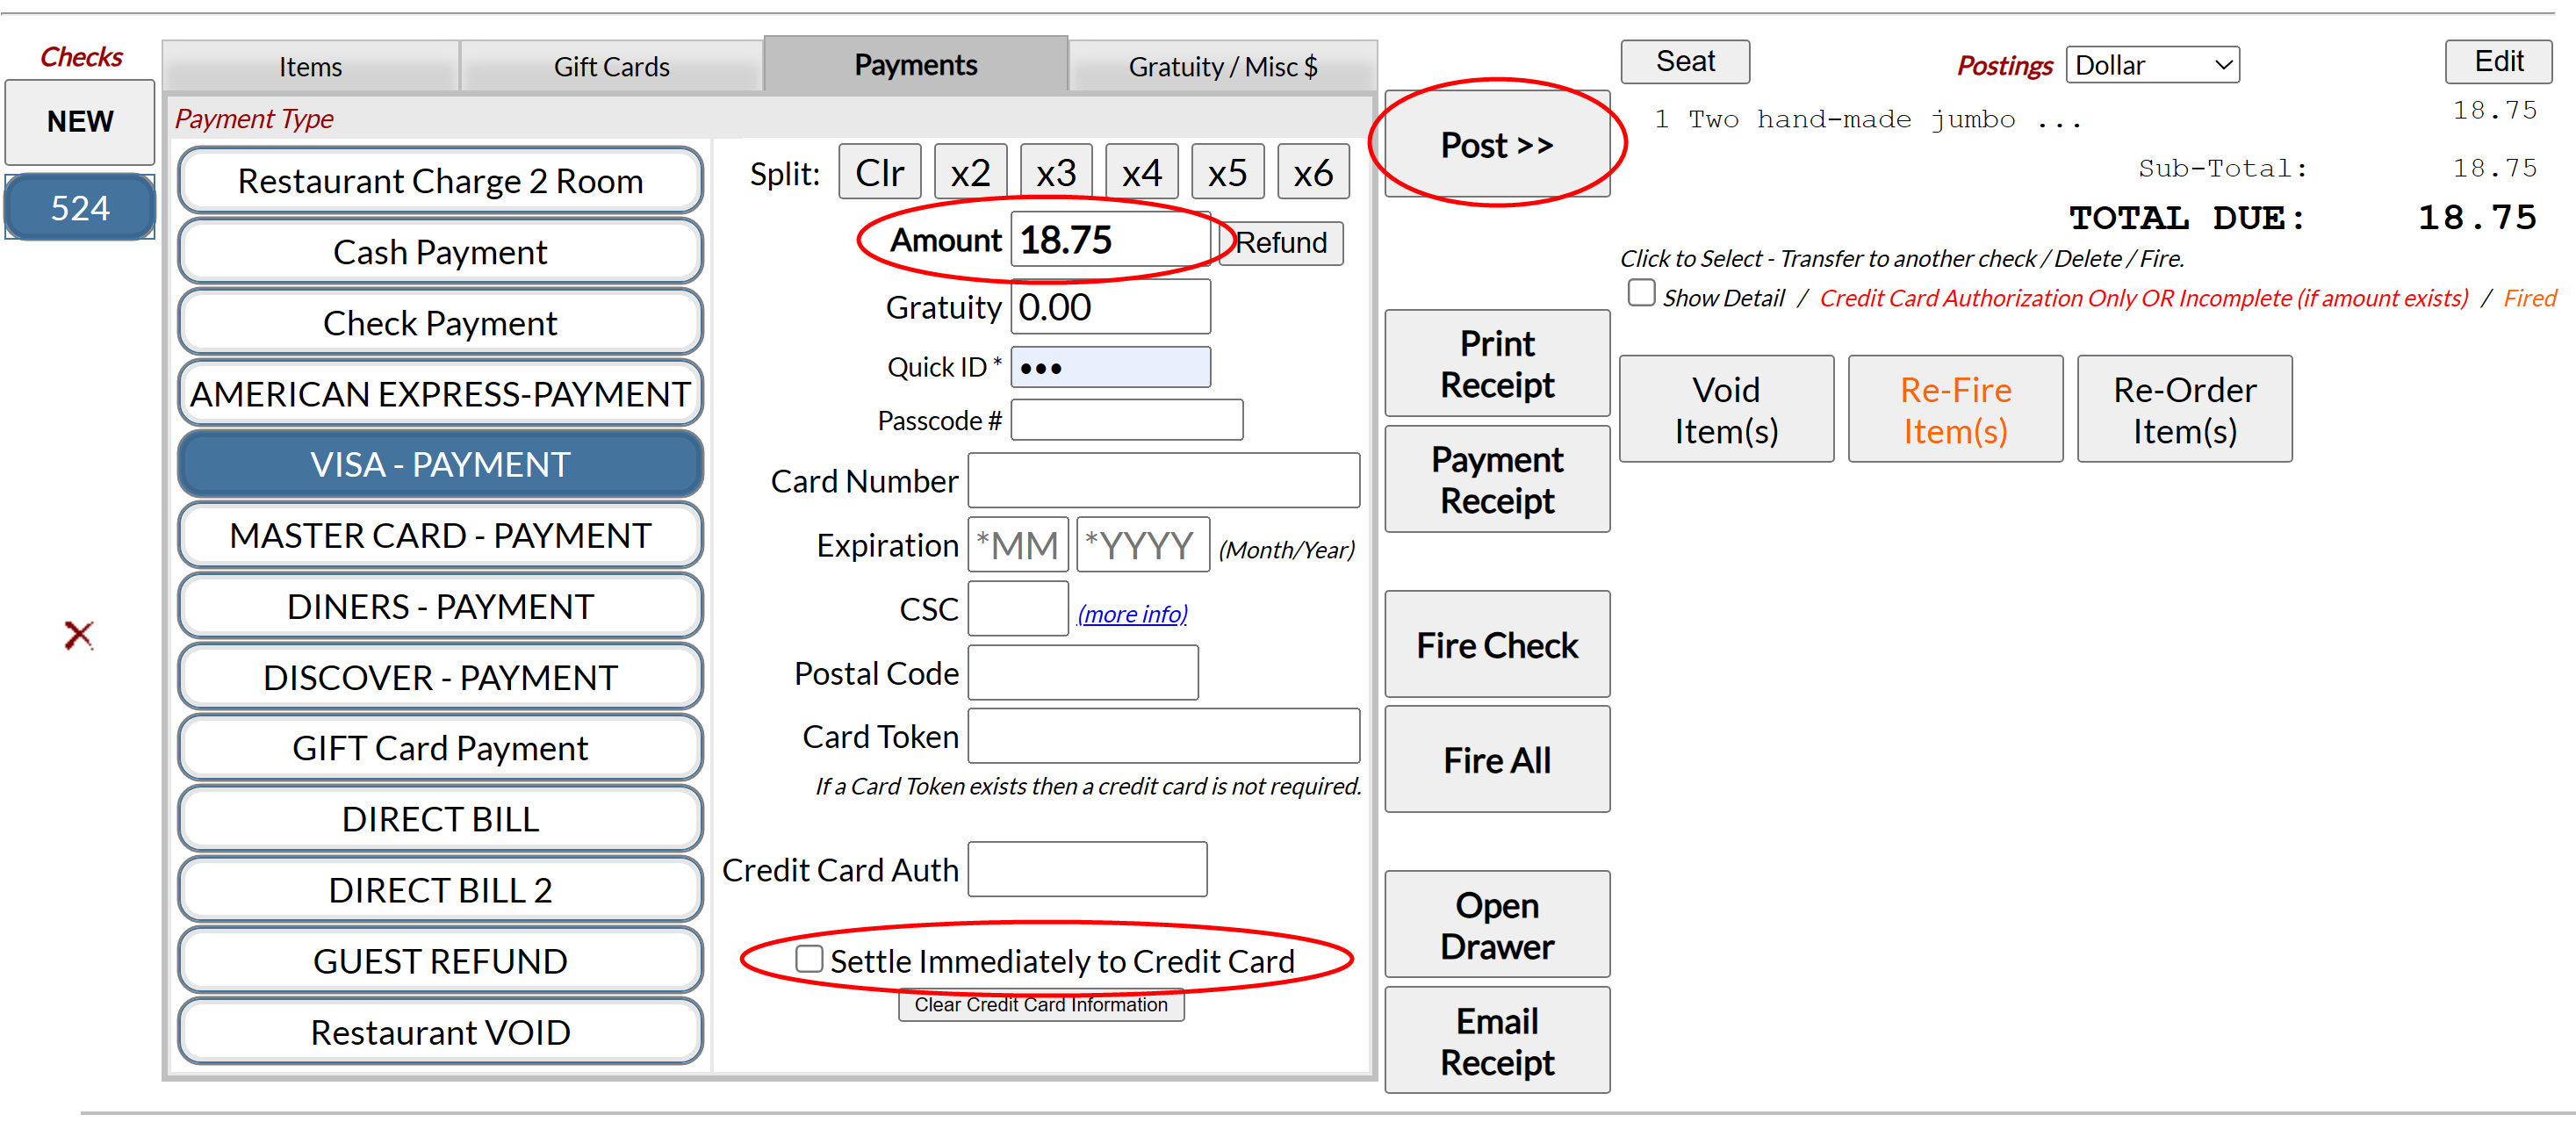
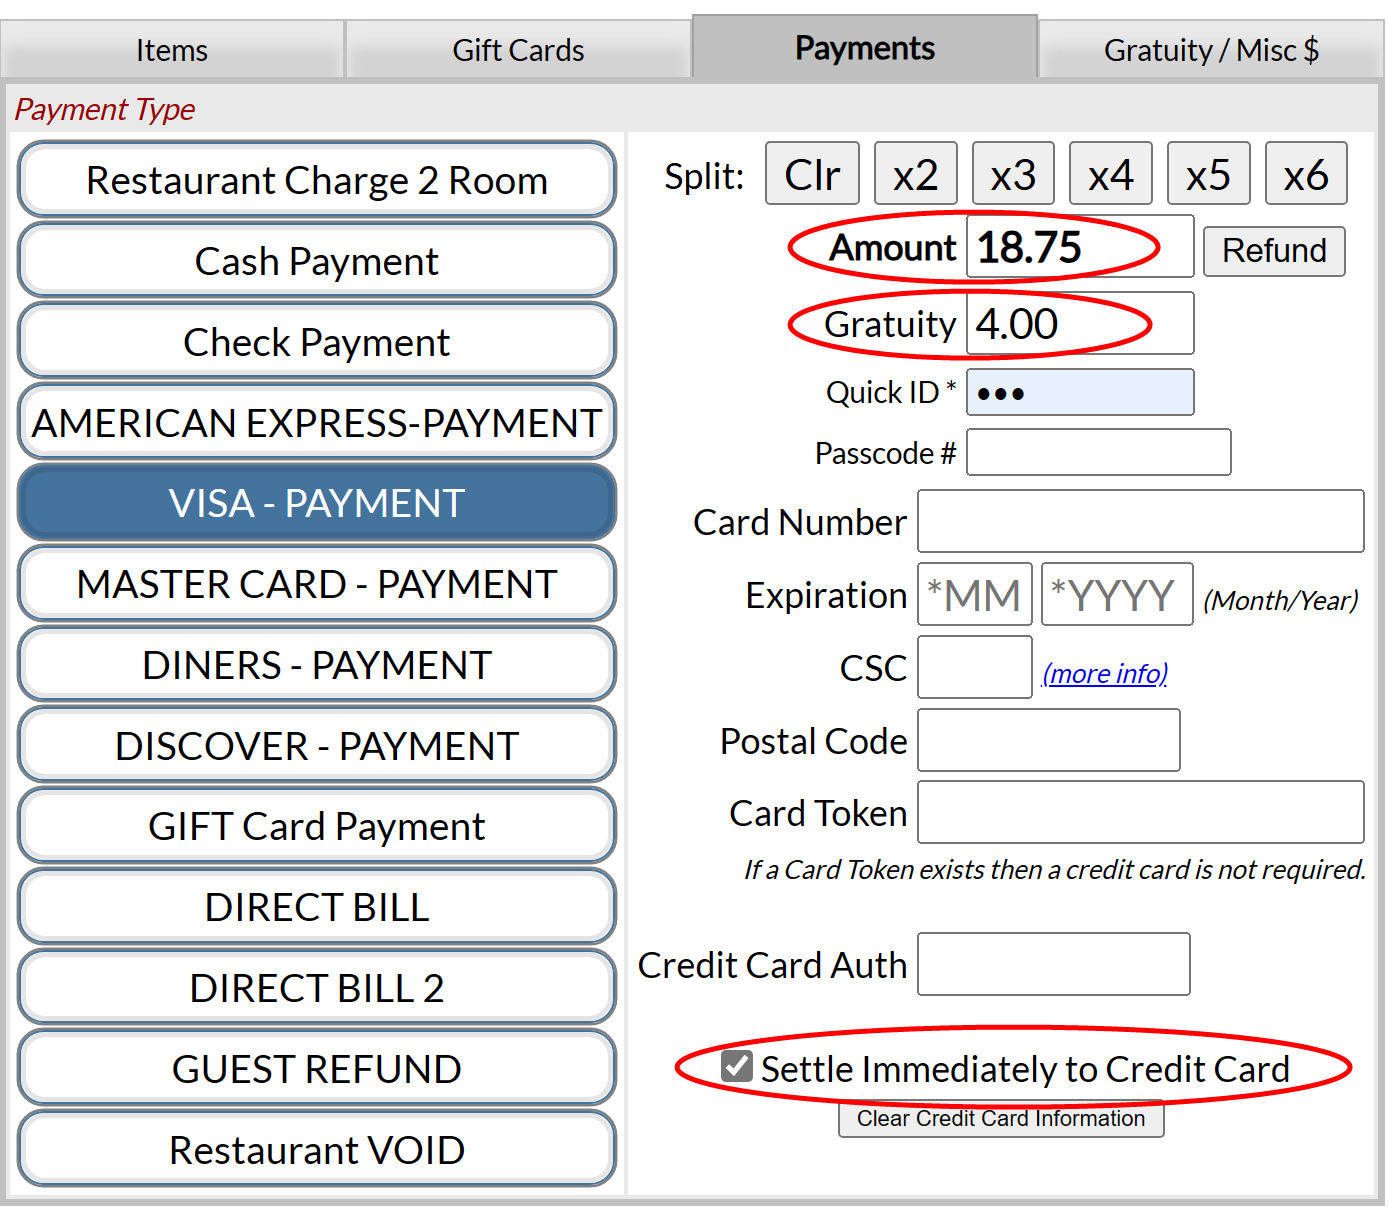
Note: In general, payment is posted to the credit card firstly as an AUTHORIZATION, which the guest then reviews, signs and enters a gratuity amount. This gratuity amount is then manually entered into the gratuity field here on the Payment tab, and the payment is then SETTLED immediately by clicking the Post button once more (posting the Amount total and the Gratuity total as final payment in one action to the credit card). If there is no gratuity to be added, you can manually check the "Settle Immediately to Credit Card" box which will then allow immediate payment after clicking the post button, however as the authorization process automatically checks this box for you, a typical restaurant style payment procedure should be one of authorization followed by settlement to ensure the correct amount is posted as the payment.
The Gratuity field in the payments tab is only used with credit card payments.
In general, when a credit card is used to make a payment, the Payment tab should be used rather than the Gratuity/Misc $ tab to add the gratuity amount. In most cases, the payment is posted to the credit card firstly as an AUTHORIZATION, which the guest then reviews, signs and enters a gratuity amount. This gratuity amount is then entered into the gratuity field on the Payment tab, and the payment is then SETTLED immediately by clicking the Post button. This will post the Gratuity and the final payment (including gratuity) in one action to the credit card, all without using the Gratuity/Misc $ tab.
(Step wise, you will post the authorization, enter the gratuity, then post the final payment).
Only if the initial payment was settled immediately instead of posting as an authorization will you use the Gratuity/Misc $ tab - in this case, the Gratuity field on the Payment tab is no longer available since the payment was settled, so you must post gratuity from the "Gratuity/Misc$" tab and then post a second payment, settled immediately, to cover that gratuity amount. .
Example: For a typical restaurant style payment procedure of authorization followed by settlement - this begins after the guest is presented a check (Print Receipt) and gives their CREDIT CARD for payment. In this case, the Payment tab rather than the Gratuity/Misc $ tab is used.
The initial payment is posted, whether for the total due or a partial payment. Most importantly the "Settle immediately to Credit Card" box should be unchecked (this should happen automatically).
This will post as an Authorization which will display in red and will not reduce the total due.
The Guest is now presented with the Payment receipt where they will sign and enter gratuity. Back at the terminal you can see that the Amount due should be filled in and the "Settle Immediately..." box should now be checked (you do not need to touch these in most cases).
Note: If necessary you can select the specific authorization by clicking on it (used mostly in the case of multiple cards on 1 check).
Below the Amount field you can enter the Gratuity amount indicated on the check.
Once the gratuity has been entered, click "Post". This will post the Gratuity and the final payment (authorized amount AND gratuity) in one action which should bring your check to a total due 0.00 balance.
Note: Gift Cards must be authorized and enabled for your Property to see this option.
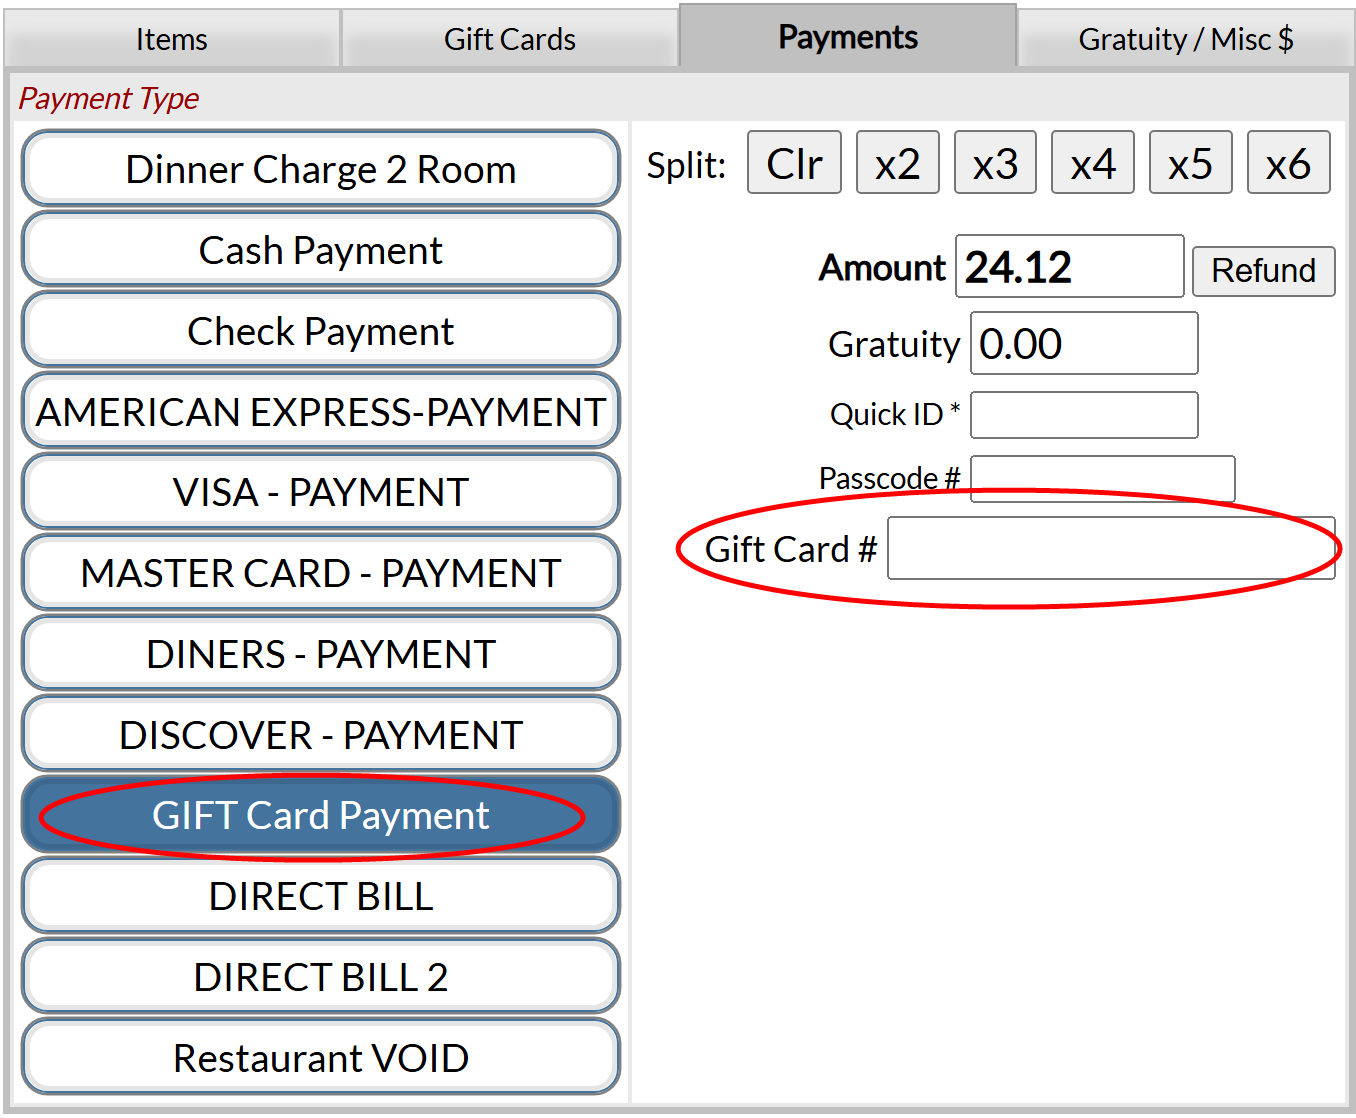
Gift Card payments act similarly to a cash payment. The payment type option has a field for the gift card number. This MUST be completed before the payment can be posted. Completing the field may be done manually, or if you have one, using a swipe/card reader (NOT the EMV device used with a credit card).
This payment tab option has a gratuity field, similar to the one seen with the credit card payment types. If desired, you may simply enter in the gratuity amount to this field BEFORE the payment is posted. Unlike the credit card payment tab, posting the payment will immediately subtract the amount from the total on the gift card, not simply authorize the charge. This field is recommended for use if the gift card payment is being used for example at your restaurant, where the gratuity will be going to the server. If the card is being used at a point of sale such as a spa, where the provider of the service is not necessarily the person taking the payment, using the Gratuity/Misc $ tab instead allows you to specify whom the gratuity is given to.
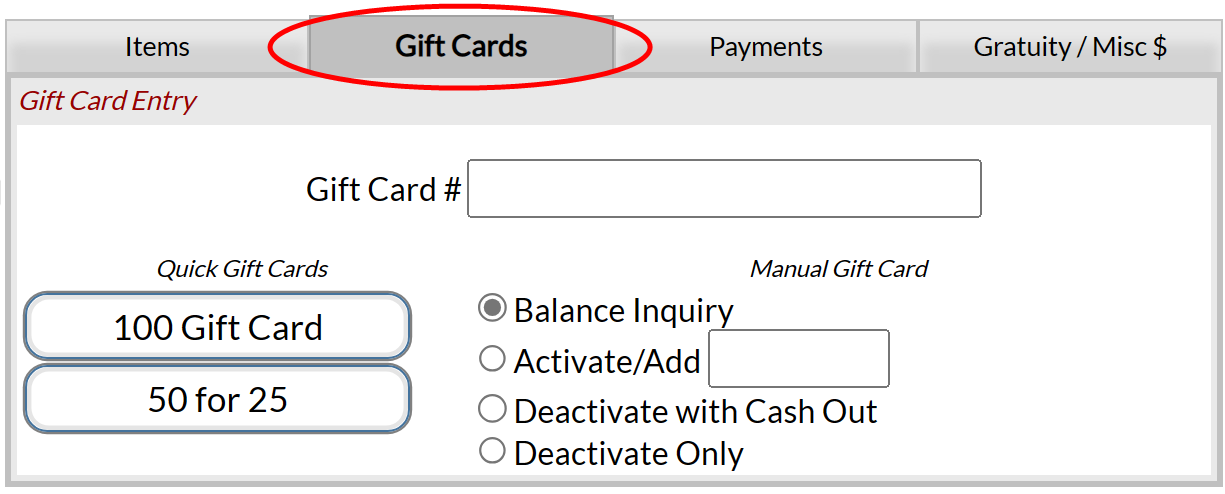
Note: Gift cards can only be used up to the total amount on the card. If this total is less than the check total, the remainder will remain on the check and requires a different method of payment. The gift card balance may be checked using the Gift Cards tab, which allows gift card activation, adding value, balance inquiry or deactivation (see the "Generate and Activate a Gift Card" section of our How to Enable Gift Card Use Help Topic for more details) but not USE of a gift card - using the gift card for payment requires the Payment tab.
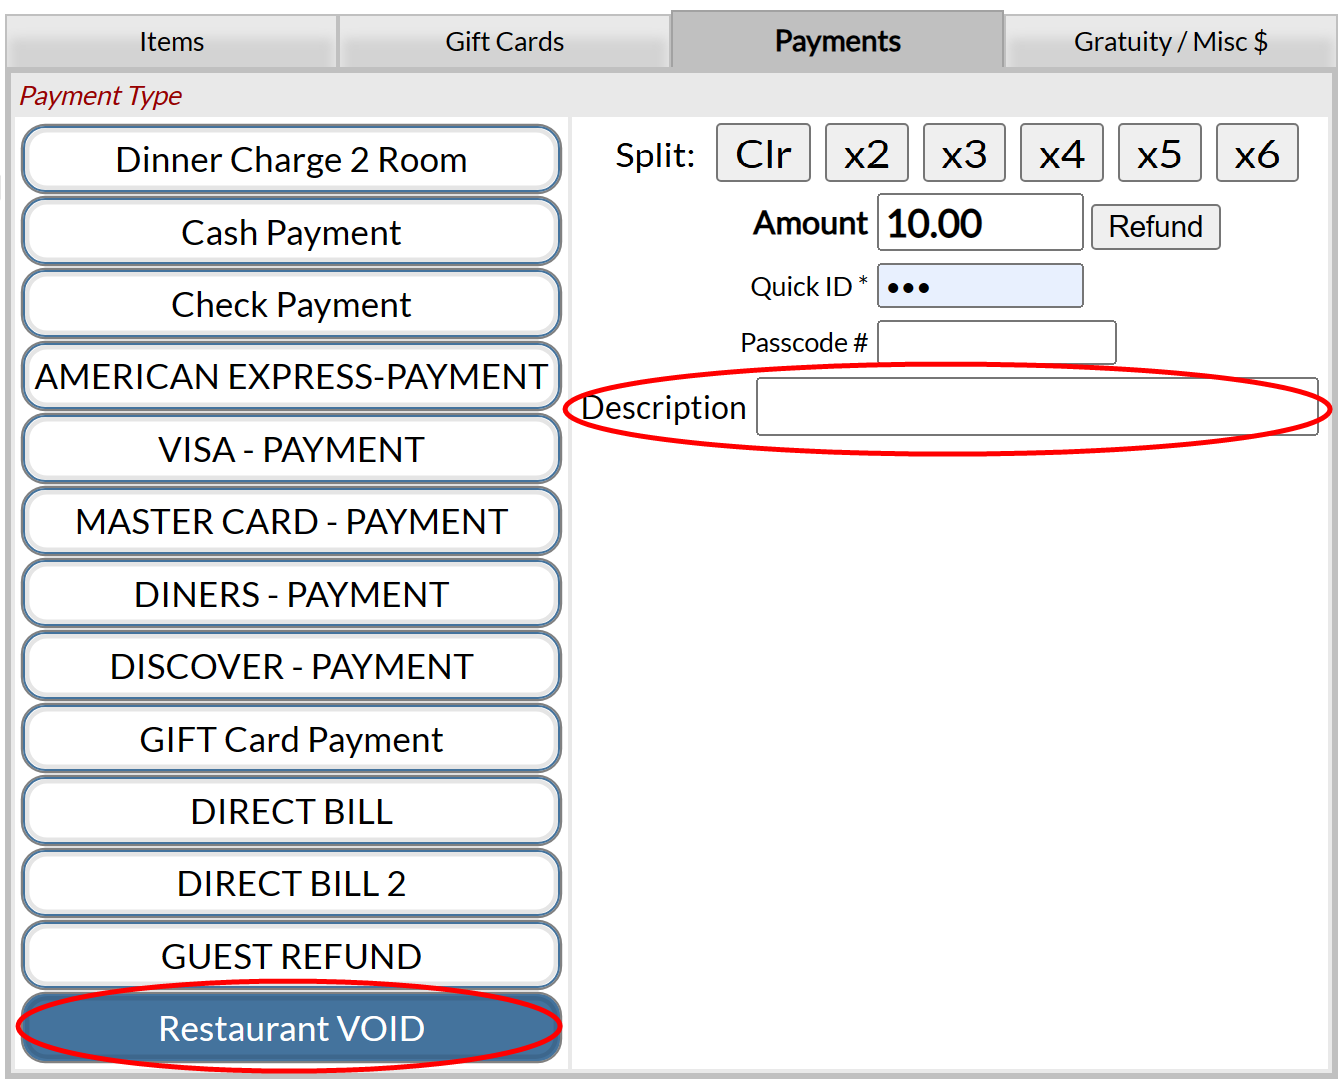
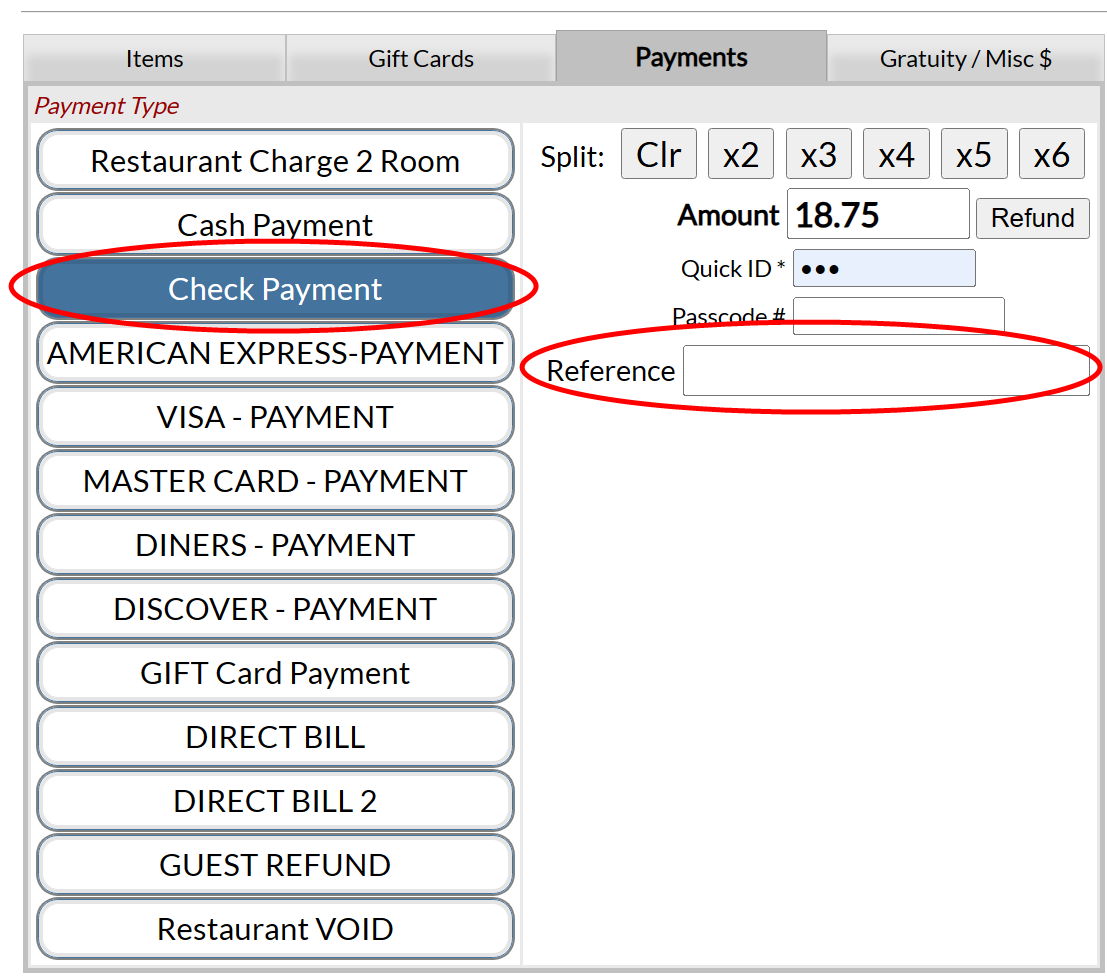
A restaurant charge may be voided if necessary using this payment type option.
You will need to post the void "payment" as you would any other payment type. In effect, the void acts as a credit towards the check. It may be for all or part of the check total.
Be sure to enter the details of the void into the description field.
Note: When a restaurant check is voided, it will be saved in Skyware. The Voided Checks command ( in the main Point of Sale (POS) menu) allows you to view and search though all voided items on checks in the system. The listing includes other forms of voids, but is defaulted to VOIDREST, which are the voids on restaurant checks.
Be sure to click Post once the payment type and associated information is entered. This applies the payment to the check. The payment will NOT be applied until you have posted it.
All posted payments will be shown on the postings statement (including how the payment was made), and when you have finished taking payment, should bring your check to a total due 0.00 balance.
One the check is paid, you can use the Print Receipt button (or Payment Receipt for a credit card payment) to provide a copy to the customer.
Note: If there is an issue with remote sending of the receipt to the printer, you will see the Check NOT printed error button and need to correct the problem before it may be printed. See Check(s) NOT Printed (POS) for more details.
When the balance on the check is zero, click Close This Check to close the check.
When the check is closed, it will be saved to Skyware and the restaurant check screen will be returned to the new check screen, ready for you to open the next check. The Check History command (in the main Point of Sale (POS) menu) allows you to view and search through all closed checks in the system.






.png)
1.png)
